CREATE WORKFLOWS
If Workflows are enabled (you can request this feature by contacting our Support Team), you'll find the "Workflows" section within the "Configuration" panel.
Before using this feature, you must create and configure a "Workflow". This includes specifying a URL (e.g., a "Webhook") created on a third-party application or site to forward data.. Take kindly note that you can find all relevant information under the "Workflow specific operations:" headline in the API documentation.
STEP 1: Click on "Workflows" in the left panel of the Portal.

STEP 2: Click the "Add Workflow" button to create your workflow. Proceed to fill in the necessary data.

STEP 3: Fill required information in "General Settings".
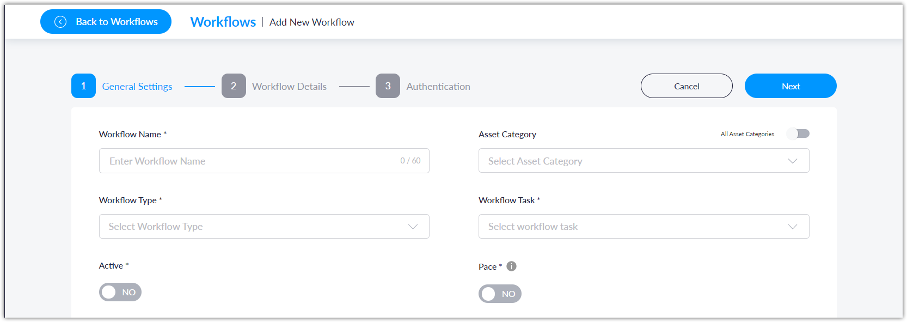
"Workflow Name" would be the name of your Workflow.
"Asset Category"
- If we leave this empty, then the Workflow needs to be activated manualy for every asset you would like to get the Workflows task data.
- If the "All Asset Categories" option is enabled, at least one asset category must be created and an asset assigned to that category for the workflow to function properly.
- If we have created more asset categories, and we want to choose only some of the existing ones to activate the workflows, there will be the dropdown list of those asset categories where we can choose from.
"Workflow Type" method which you want to use to recive the data
- "Webhook" a 3rd party application or site where you create URL where the data will be forwarded.
- "E-mail" any email where you would like to forward the data.
"Workflow Task" is where you choose the type of information to be sent. We are currently sending the following data to Webhooks (Workflows):
- Every X second(s): This workflow triggers an alert at predefined intervals, which can be set to specific time frames, such as every minute (60 seconds) or any number of seconds you specify.
- Location changed: Triggers an alert when an asset moves from its current location to another.
- Alert offline: Get a notification when a Blyott sensor goes offline.
- Button pressed: Triggers an alert when the button on a Blyott sensor is pressed.
Note: This feature is specifically available for the following sensors:
- Standard Sensor (BT-T1 and BT-T2)
- Patient Sensor (BT-B1)
- Badge (BT-BD)
- Movement detected: Receive a notification when an asset is in motion.
Note: This feature is specifically available for the following sensor:
- Standard Sensor (BT-T1) - Outside asset's zone: Triggers an alert when an asset leaves a predefined zone.
Example:You set an Outside Specific Zone alert for infusion pumps in the pediatric ward.
- Scenario: An infusion pump assigned to the pediatric ward is detected outside its designated zone, such as in the surgical department.
- Alert Triggered: You receive an alert notifying you that the infusion pump has left the pediatric ward, potentially indicating misplacement or unauthorized use.
Note: To enable this feature, you need to configure Zones within the Blyott Business Dashboard.
A Zone can be defined as a group of locations, such as all rooms and areas belonging to a specific department. For example:
A Zone for the Surgical Department may include all operating rooms, pre-op areas, and recovery rooms.
- Floor changed: Get a notification when an asset moves to a different floor level.
- Zone changed: Get a notification when an asset changes zones.
Note: To enable this workflow, you need to configure Zones within the Blyott Business Dashboard. - Inside specific zone: This workflow triggers an alert when an asset enters a predefined specific zone.
Note: To enable this workflow, you need to configure Zones within the Blyott Business Dashboard. - Outside specific zone: Receive an alert when an asset moves out of a designated specific zone.
Note: To enable this workflow, you need to configure Zones within the Blyott Business Dashboard. - Battery: Receive an alert when the battery of a Blyott sensor exceeds a predefined threshold.
- Temperature: Get alerted when the temperature recorded by a Blyott sensor reaches or exceeds a predefined threshold.
- Alert Asset Category Zone Threshold: Receive an alert when the number of assets in a specific category within a designated area exceeds or falls below the set threshold.
Example:
You set an Alert Asset Category Zone Threshold for wheelchairs in the hospital's emergency department.
- Threshold: Minimum 5, Maximum 15
- Scenario 1: If fewer than 5 wheelchairs are detected in the emergency department, an alert notifies you that there might be a shortage.
- Scenario 2: If more than 15 wheelchairs are detected, an alert notifies you of potential overcrowding or misplaced assets.
- Alert Locator: Get an alert when a locator is offline.
- Locator Detection: Get an alert when a Blyott sensor is being picked up by a specific locator.
-
Absent from location
-
Sends an alert if an asset has not been seen for X amount of time at a specific location.
-
Ideal for tracking assets that require regular checkups and for identifying equipment that hasn’t yet visited required locations.
-
"Active": This option allows you to activate or deactivate the current Workflow. Ensure it is set to Active if you wish to forward payload data to the Webhook URL.
"Pace": By activating Pace, you will receive updates on actions at the interval you specify (every --:-- seconds). If there are no actions, no updates will be sent.s. As soon as the action occurs, when set interval passes, you will receive an update.
For the next step please follow the instructions below depending on which Workflow Type you use.
- Workflow Type = Webhook
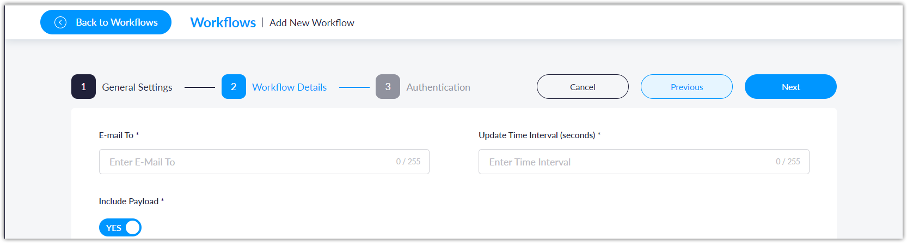
STEP 4: Fill required information in "Workflow Details".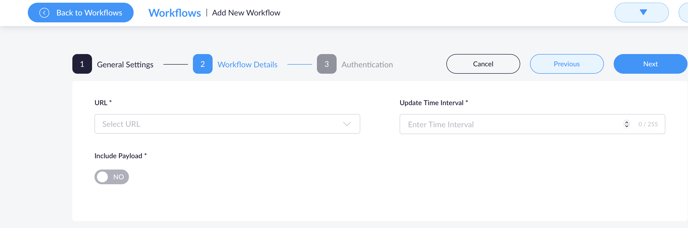
"URL" is the Webhook link that is created on the 3rd party site and this is the URL where we forward payload to.
"Update Time Interval (seconds)" is the timeframe in which the payload is registered and forwarded to the webhook URL.
STEP 5: Choose or Create Your SMTP Provider
You now have two options for sending email alerts:
-
Use your own SMTP provider
Go to Settings → SMTP Providers → Add SMTP Provider and fill in the required details.
For example, if you use Gmail:-
Host:
smtp.gmail.com -
Port:
587 -
Username and Password: your Gmail SMTP credentials.
-


"SMTP Email" is an email payload is sent through to the e-mail you choose in step 2.
"SMTP Host" Your technical service team can provide this information.
"SMTP Port" Your technical service team can provide this information.
"SMTP Username" can be the same as the SMTP Email.
"SMTP Password" is generated in the email settings of the SMTP email, or it is the same as the password of the SMTP email. e.g. If you are using the Gmail SMTP email. The "SMTP Password" needs to be generated in the security settings of the Gmail.
2. Use the default Blyott provider
Simply select the Blyott default SMTP provider.
Once created, you will receive alerts from an email address in the format (tenantname)@blyott.com.

If you have any questions or suggestions at all, please feel free to get in touch with us at helpdesk.blyott.com
Thanks and regards,
The Blyott Support Team