1. INTRODUCTION
In this guide, you will be able to see, create, search, and edit Users, Assets, Tags, Locators, and Locations. At the bottom of this document, you can download the PDF file.
1.1.GETTING FAMILIAR WITH THE BLYOTT DASHBOARD
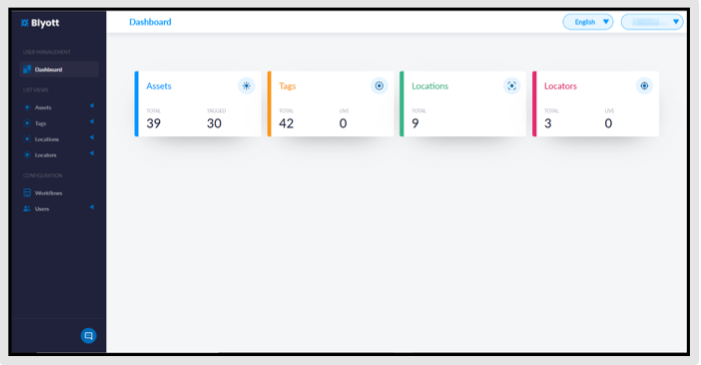
Once logged in, you will land on the Dashboard where you will find Assets (total and tagged), Tags (total and live), Locations (total) and Locators (total and live).
The “Dashboard” gives us a clear view of all assets and how many of them are tagged. On the left side, there is a panel with User Management, List Views, and Configuration tabs. Take note that different screen sizes change the layout of the panel, on smaller screens the panel will be on the right side following the responsiveness of the webpage – RWD.
1.2.GETTING FAMILIAR WITH THE BLYOTT EXCEL TABLE
The Excel table is the database of all information needed for the platform to work properly. Usually, this table is prepopulated with all hardware and imported to the platform by your local IT department before your team starts to use the platform.
Here we populate the list of existing Locations, Locators, Tags, and Assets with all relevant data.

For accelerated onboarding, we created a simple shortened table called “Onboarding Excel Table” with minimal data which is needed to jump-start the setup and creation of client accounts. Here you can add essential data like Locations, Locators, Tags, and Assets and forward the table to the support team to import it for you.
2. USER MANAGEMENT
2.1.Creating a new „User”
When you click on the “Users” tab on the “Configuration” panel, you can add the people/users that need to have access to your Blyott Platform. You will start with either “Admin” or “User” role. After login, on the Dashboard you need to click on the “Users” tab from the left side panel and then click on “+Add User” button. Here you will need to include the following information:
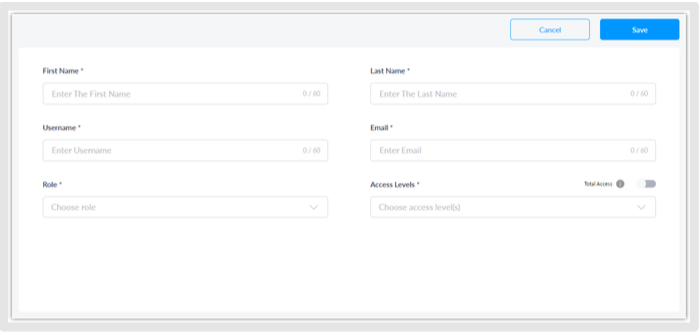
“First Name” - Name of the person.
“Last Name” - Last Name of the person.
“Username” - Must be unique, non-taken username in the system, otherwise you will get error message after you click “Save”. Just change your Username if this happens and make sure that it does not contain any spaces (there is no LDAP support currently).
“Email” - Please be sure to add the correct email, as they will receive an invitation to the Blyott with username and temporary password. After logging in, the user will be prompted to change the password and then the account will become active.
“Role” - (you can choose following)
Administrator: Can administrate the system, make changes, and add other users.
User: Can only access and search for assets on the system.“Access levels”
By clicking on “Total Access” user will get access to all assets.
If you want to limit access level for the user, you can choose the access level for a certain department like Dermatology, Radiology, Pediatrics, and others. You can choose multiple departments.
The access levels allow you to determine which users can see or keep track of what equipment. It is likely that users in a certain division will only want to keep track of their own assets. For example, a nurse in the cardiology department may only require tracking cardiology-based equipment. Whereas a site engineer or technician may need to track equipment from various departments for maintenance.
Access levels allow you to define/create wards/rooms, types of equipment and add additional criteria meeting your local situation. More on that in Configuration>Access levels part.
3. LIST VIEWS
3.1. ASSETS
Here you can enter all the assets that you want to keep within the platform. Equipment you want to track, find its real-time location, is going to be assigned to the tag. This means that a tag’s ID/MAC Address is going to be attached to a specific asset. At this moment you will have to physically place a tag on that particular asset (equipment or device).
Clicking on the “Assets” tab on the “List Views” panel, depending on your “Access Level”, you will see the equipment list with information like Asset Type, Code, Access Levels, Tag Assigned, Last Seen, Location, etc.
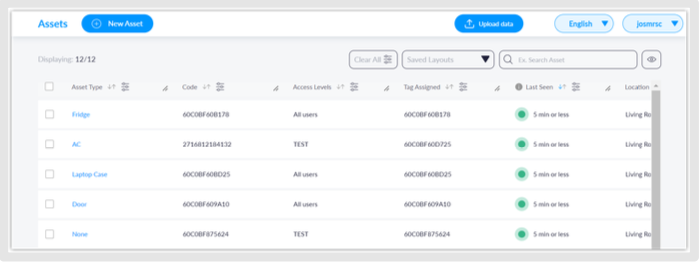
Here you can do the following:
Add New Asset
To add more assets, click on “+ New Asset” button and fill in the following data:
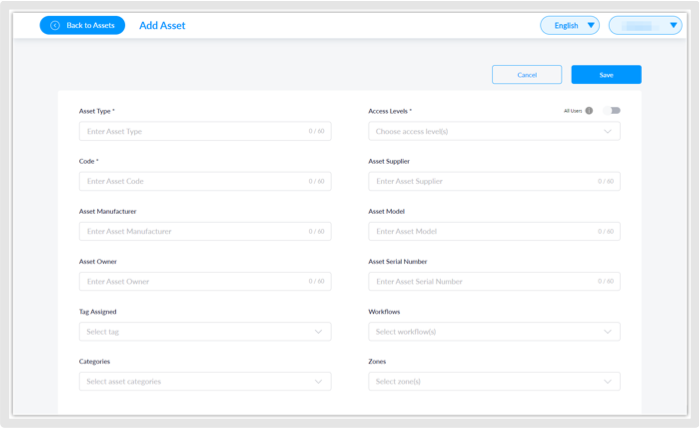
NOTE - All fields marked with “*” are mandatory, while others are optional.
-
“Asset Type” - Name of the Asset specify the name of the equipment you want to add to the platform. For example, “Wheelchair” or “Monitor”.
-
“Access Levels” - If “All Users” are turned on then the User has access to all assets. If specific Access Levels are created, you can choose those from the dropdown list.
-
“Code” - Create a unique code for the asset (Example for defibrillator: DF01). To follow organization of assets, where the naming suggests (in prefilled excel table) code name for defibrillators with prefix “DF” then we add defibrillators names accordingly. If there is not prefilled data then we choose our code name as we want, keeping in mind to organize names meaningfully.
-
“Tag Assigned”
Leave this blank if you have no interest in tracking this asset.
Assign the tag if you DO want to track the asset – use the Tag ID from the dropdown list.
Once the Assets have been added, they can be searched for within the platform by selecting the search field (Ex. Search Asset) in the upper right top of the screen.
See and Edit Asset details
If you want to see detailed information about the asset, click on the desired asset and there you will see the following:
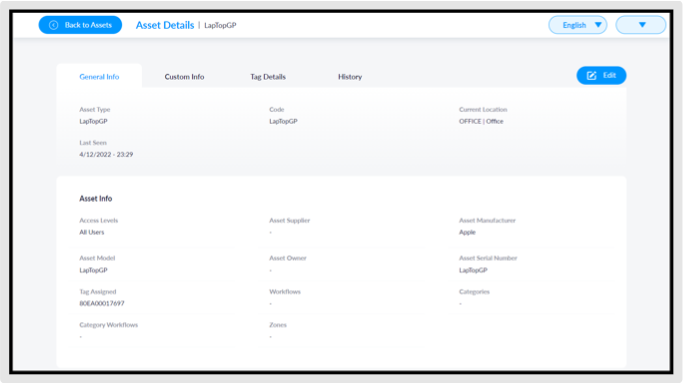
-
“General Info” - Here you can find Asset Type, Code, Current Location, Last Seen.
-
“Asset Info” - Here you can find Access Levels, Asset Supplier, Asset Manufacturer,
Asset Model, Asset Owner, Asset Serial Number, Tag Assigned, Workflows, Categories,
Category Workflows, Zones.
-
“Custom Info” - Here you can find information about all active Custom Fields you
added in the Asset Column.
-
“Tag details” - Here you can find Tag info about ID, NFC, Type, Fixed Location,
Hardware Model, Asset assigned, Machine Learning Location, RSSI-based location,
Location Status, Room Category.
-
“History” - Here you can find the history of Asset Locations.
-
“Edit” - Here you can edit all the information about the chosen Asset.
3.2. TAGS
Tags are essential for the Blyott platform. They need to be scanned, registered, and placed on the equipment so that the assets (equipment) can be tracked successfully.
Here you can enter all the tags that you have purchased to track and find the real-time location of your equipment. Each tag has unique information called ID which is MAC Address. You can find this information usually written on the top of the Tag or by using an Blyott App (this can be downloaded onto any smart mobile device). This means that ID/MAC Address is going to be attached to a specific asset. You will also need to physically place a tag on that piece of equipment.
Clicking on the “Tags” tab on the “List Views” panel, depending on your “Access Level” you can see tags list with information like ID, NFC, Type, Fixed Location, Hardware Model, Asset Assigned, etc.
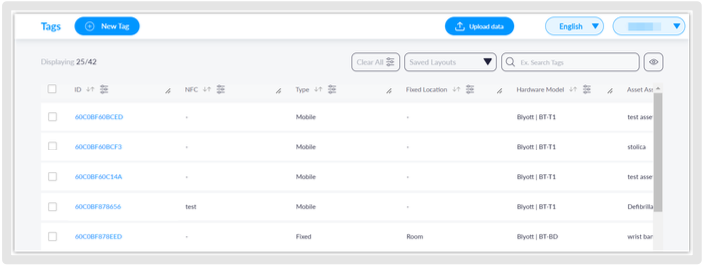
Here you can do the following:
3.3. ADD NEW TAG
To add more Tags, click on the “+ New Tag” button and fill in the following data: 1. Click „Enable“ on Webhooks section which will open the following:
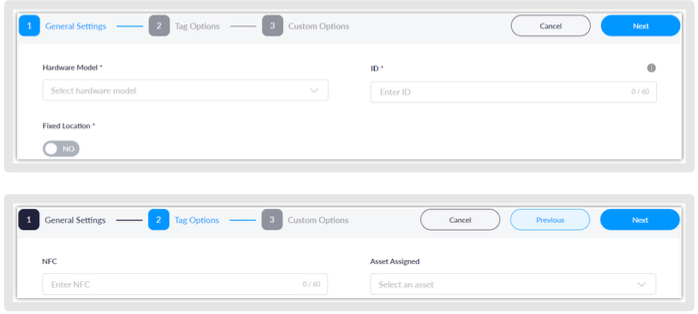
NOTE - All fields marked with “*” are mandatory, while others are optional.
-
“Hardware model” - Select hardware model of the Tag from the dropdown list:
- Standard Sensor Lite = BT-T1L
- Tiny Sensor = BT-TT
- Sticker Sensor = BT-BS
- Patient Sensor = BT-B1
- Standard Sensor Ruggedised = BT-T1R
- Badge = BT-BD
-
“ID” - Enter the MAC address of the tag device. *
-
“Fixed Location”
o NO (if the tag is likely to be attached to a piece of equipment that will be moved often)
o YES (if the tag is going to be attached to a piece of equipment that is not expected to move)
o If “Type” is selected “Fixed”, you will need to create fixed locations in the
“Location” tab before you can select that location here. If the “Type” is “Mobile”
then this is not available to select as it does not require fixed location.
o “NFC” - Enter NFC ID of the tag device. *
o “Asset assigned” - Assign the asset(equipment) you would like to track. You will need to create an Asset before if you want to connect a Sensor with an Asset here. You can always assign it later.
* Be sure to enter the correct ID/MAC. MAC address is indicated on the top of the device. Enter the MAC address in capital letters and without the colon (:). If the number is not visible on the Tag you can easily scan it using a Blyott Mobile app downloaded from your relevant app store.
Once the Tags have been added, they can be searched for within the platform by selecting the search field (Ex. Search Tags) in the upper right top of the screen.
3.4.SEE AND EDIT TAGS DETAILS
If you want to see detailed information about the Tag, click on the desired Tag and there you will see the following:
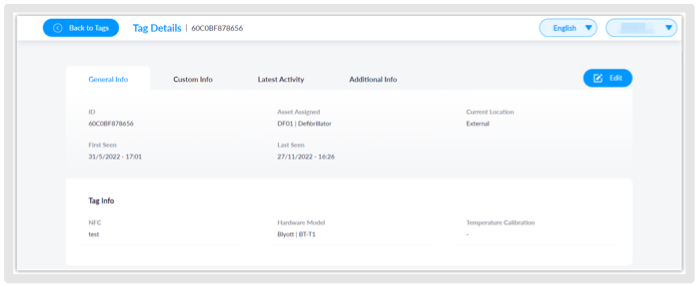
- “General Info” - Here you can find ID, Asset Assigned, Current Location, First Seen, Last Seen.
- “Tag Info” – Here you can see NFC, Hardware Model, Temperature Calibration.
- “Custom Info” - Here you can find information about all active Custom Fields you added
in the Tags Column. - “Latest Activity” - Here you can find Location Name, Location Code, Last Seen,
Temperature, Battery, Signal Strength. - “Additional Info” – Here you can find the Tag State.
- “Edit” - Here you can edit all the information about the chosen Tag (except the ID).
4. LOCATIONS
Here you can add the locations where you expect to install locators and track equipment. In addition to the name and code, you can add more detailed information like Floor, Wing, Building, etc.
Clicking on the “Locations” tab on the "List Views” panel, depending on your “Access Level”, you can see the locations list with information like Location, Code, Status, Assets on Location, Surface Area, Site, etc.
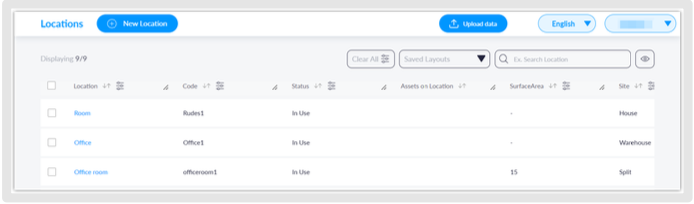
Here you can do the following:
4.1.ADD NEW LOCATION
To add Location, click on the “+New Location” button and fill in the following data:
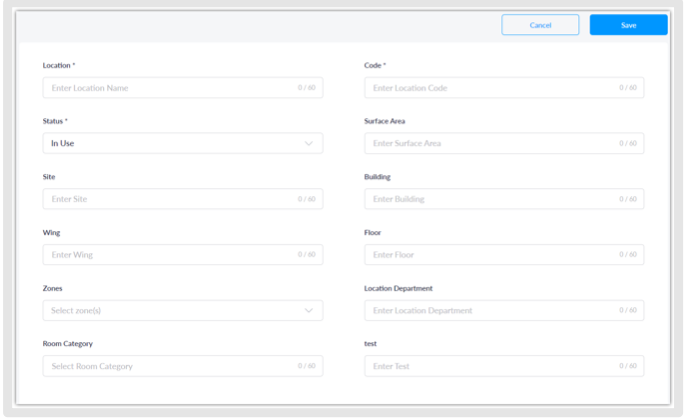
NOTE - All fields marked with “*” are mandatory, while others are optional.
“Location” - Enter desired location name.
“Code” - Location Code must be unique, non-taken code in the system, otherwise you will get an error message after you click “Save”. Just change your Code if this happens and make sure that it does not contain any spaces.
“Status” -
- In Use (if the location is constantly in use) set up automatically as it is mostly used.
- Available (we suggest marking locations such as 'storage rooms' as inactive or any location where equipment is stored, but not actively used)
- In Maintenance
Once the locations have been added, they can be searched for within the platform by selecting the search field (Ex. Search Location) in the upper right top of the screen.
4.2.SEE AND EDIT LOCATIONS DETAILS
If you want to see detailed information about the Locations, click on the desired location and there you will see the following:
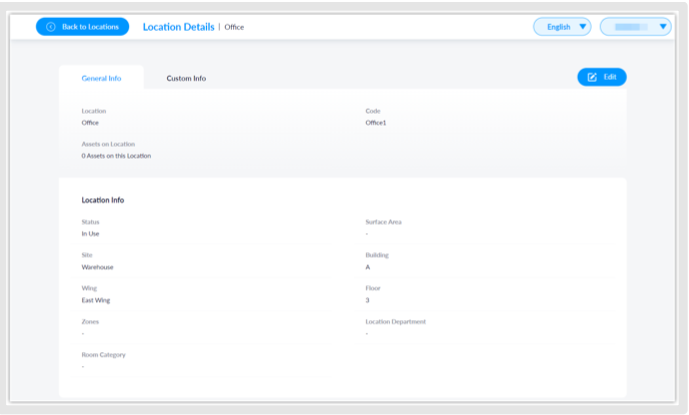
- “General Info” - Here you can find Location, Code, Assets on Location
- “Location Info” - Here you can find Status, Surface Area, Site, Building, Wing, Floor< Zones, Location Department, Room Category.
- "Custom Info" - Here you can find information about all active Custom Fields you addes in the Locations Column.
- "Edit" - Here you can edit all the information about the chosen Location.
5. LOCATORS
Locators are the devices that are required to locate all assets in the designated area. This page will provide instructions on how to add/set up a new locator to the Blyott platform. For external devices, please see our detailed configuration manuals on the Blyott support page.
Here you can enter all locators that you are using to receive signals from Bluetooth Tags. Each locator must have an associated location as this is how the system “knows” where your equipment is located.
Exception is Mobile Locator which uses GPS coordinates to send exact location of the Tag.
As an example, the Bluetooth tag that is linked to a piece of equipment was read by Locator A – when you entered Locator A into the platform, you defined it as being in Storage Room 1.
Clicking on the “Locators” tab on the left side panel, depending on your “Access Level”, you can see the locators list with information like Locator, Location, Location Code, ID, Type, Last Seen, Serial Number, IMSI, Hardware Model.

Here you can do the following:
5.1.ADD NEW LOCATOR
To add more Locators, click on the “+New Locator” button and fill in the following data:
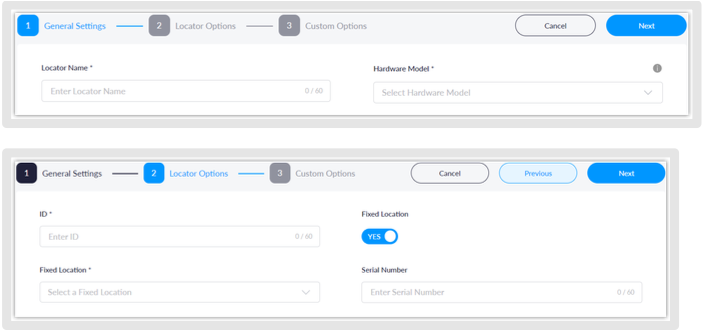
NOTE - All fields marked with “*” are mandatory, while others are optional.
-
“Locator Name” - Enter locator name.
-
“Hardware model” - Select the hardware model of the locator device.
-
“ID*”
o Enter the MAC ID of the device.
o Important note! MAC format is different for external MIST AP devices. Please see The Mist Configuration Manual if you are using Mist AP devices.
- “Type”
o Mobile (if the locator is likely to be moved often)
o Fixed (if the locator is not expected to move)
o Wi-Fi (if you are using a Wi-Fi access point to pick up a Bluetooth tag signal) -
“Fixed Location”
o NO (“Type” is “Mobile” then it does not require fixed location)
o YES (“Type” is “Fixed” or “Wi-Fi”, you will need to create locations in the“Location” tab before you can select that fixed location here.
-
“Serial Number” - Enter the serial number of the device.
* Be sure to enter the correct ID/MAC. MAC address is indicated on the bottom of the device. Enter the MAC address in capital letters and without the colon (:).
If the number is not visible on the Locator, you can easily scan it using a mobile app downloaded from your relevant app store. This can be confirmed locally with your IT team and/or occasionally marked on the device.
Once the Locators have been added to the Blyott Portal, they can be searched for within the platform by selecting the search field (Ex. Search Locator) In the upper right top of the screen.
5.2.SEE AND EDIT LOCATORS DETAILS
If you want to see detailed information about the Locator, click on the desired Locator and you will see the following:
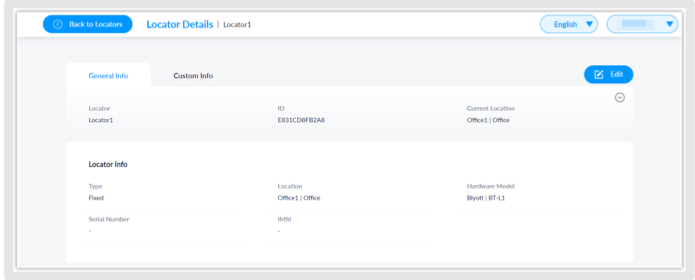
-
“General Info” - Here you can find Locator, ID, Current Location.
-
“Locator Info” - Here you can find Type, Location, Location, Hardware Model Serial
Number, IMSI.
-
“Custom Info” - Here you can find information about all active Custom Fields you
added in the Locators Column.
-
“Edit” - Here you can edit all the information about the chosen Locator (except the ID).
6. CONFIGURATION
6.1.ACCESS LEVELS
Here you can see all “Access Levels” mentioned in the “Creating a new User” part above. You can imagine them like separate departments within the hospital like Dermatology, Neurology, Pediatrics.
Clicking on the “Access Level” tab on the “Configuration” panel under the section “Users”, you can see all Access Levels with Descriptions.
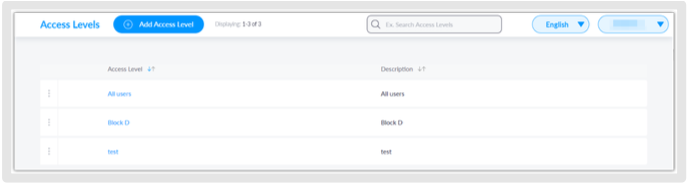
Here you can do the following:
6.2.ADD NEW ACCESS LEVEL
To add Access Level, click on the “+ Add Access Level” button and fill in the following data:

-
“Access Level” - Enter the desired name.
-
“Description” - Short description of the Access Level.
Once the Access Levels have been set up and are active, they can be searched for within the platform by selecting the search field (Ex. Search Access Levels) from the upper right top of the screen.
6.3.SEE AND EDIT ACCESS LEVELS DETAILS
If you want to see detailed information about the Access Levels, click on the desired Access Level and there you will see the following.
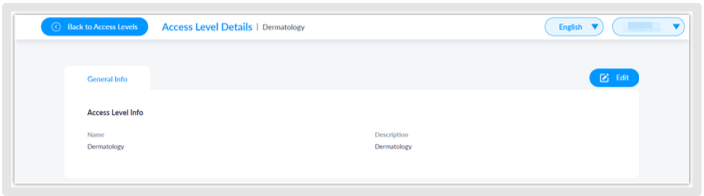
-
“General Info” Here you can find Name, Description
-
“Edit Button” Here you can edit chosen Access Level information.
6.4. WORKFLOWS
If enabled by our side (you can request enabling by contacting Support Team), you will seein the “Configuration” panel “Workflows” section.
Before you start to use it, you need to create and configure the "Workflow". Take kindly note that you can find all relevant information following this guide on how to create Workflows.
Create Workflow.
Additionally find more relevant information under the "Workflow specific operations:"headline in the API documentation.
7. ADDITIONAL DETAILS
7.1.BLYOTT SUPPORT & ASSISTANCE
Within this Help Center, we aim to provide you with useful information, documentation, and guidance that will enable you to make the most out of your access to the Blyott Platform.
In the Knowledgevbase section you can find a video walkthrough guide for the support page, Release Notes, Documentation, Manuals, and “How To” guides.
Please be reminded that you need to register or log in to your account to access all Blyott Related Documentation on the Blyott Support Page.
For everything else do not hesitate to contact us at helpdesk@blyott.com.
Thank you for your attention.
The Blyott Support Team