.png?height=120&name=logoblyott_white_cmyk(1).png)
This document will provide information on how to connect Aruba devices to the Blyott Platform
1. INTRODUCTION
Welcome to the ARUBA configuration guide. Within this guide, we aim to provide you with useful information and guidance to make the connection to Blyott using ARUBA AP devices. Before we show you how to configure the Blyott part, ARUBA has technical documentation for configuring IoT. Please see this link which can already give you some insight into the setup of the network. For generic purposes, you can always point to this link for additional information on Aruba.
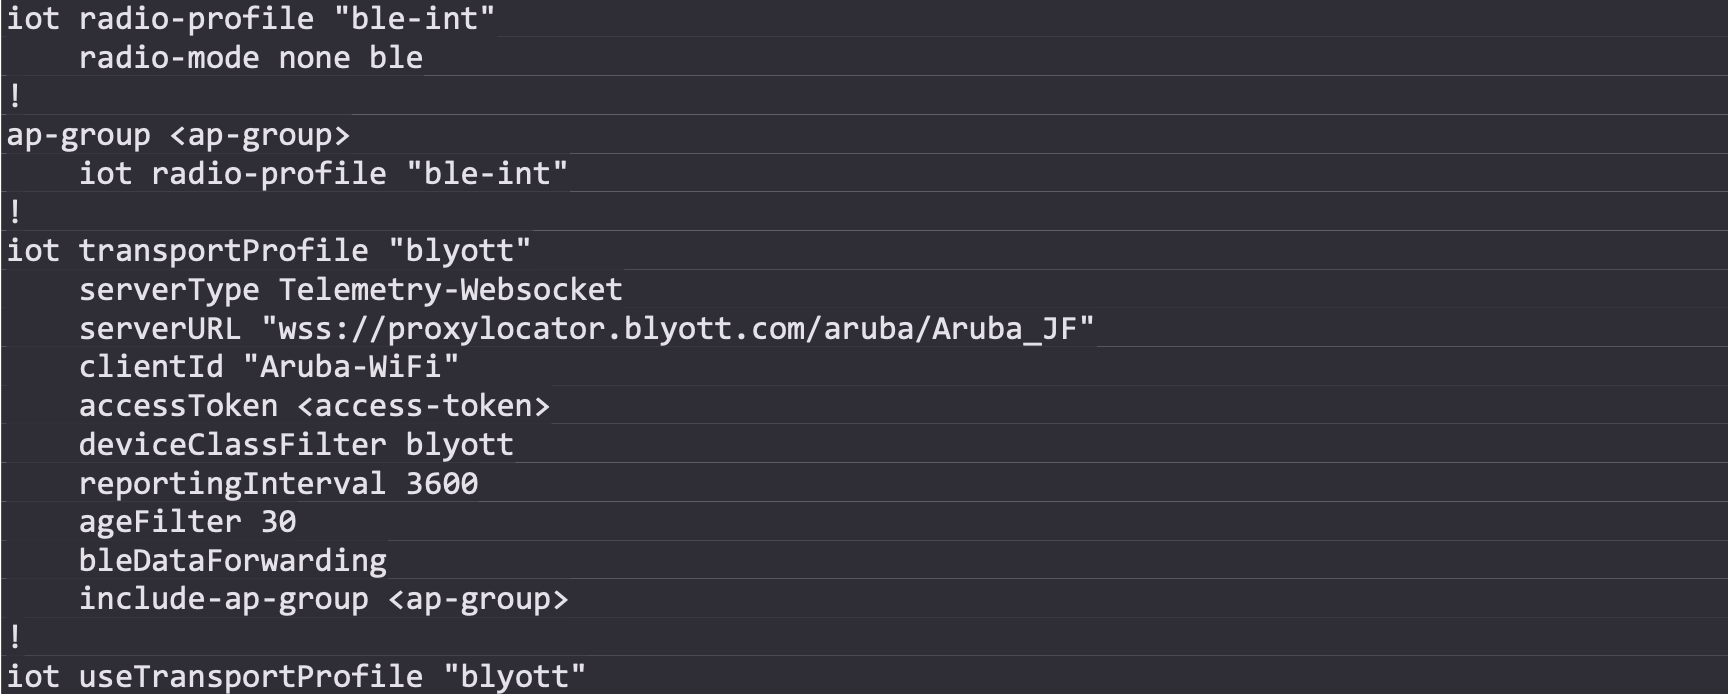
This example shows the required configuration to enable the Blyott location based and monitoring solution integration using ArubaOS/Aruba Instant version 8.8.x.x or higher.
A configuration guide for ArubaOS 8.7.x or lower is available: Blyott Aruba configuration guide 8.7.x
The Blyott solution integration uses the BLE data transport service with the device class Blyott to report location (RSSI), temperature and battery level information in a custom BLE advertisement format in real-time to the cloud-based backend/dashboard.
-
access-token - has to be replaced with the static access token used to connect to the remote server (access token is provided by Blyott support at helpdesk@blyott.com).
-
client-id - (optional) has to be replaced with the client identifier string that is used by the remote server to identify the connecting Aruba infrastructure, e.g. “Aruba-Wi-Fi”.
-
ap-group - has to be replaced with the AP group name the configuration should be enabled on (multiple statements are required for multiple groups) (ArubaOS only).
IMPORTANT NOTES: This guide only applies for Aruba SW 8.8. or higher using the “telemetry- WebSocket” method. For versions 8.7. or lower please follow this guide using the “telemetry-HTTPS” method.
Access token: To get the Aruba Access token you need to reach out to Blyott support at helpdesk@blyott.com.
2. CERTIFICATE CHAIN
IMPORTANT NOTE
The complete Root certificate chain must be installed on the Aruba infrastructure for the secure HTTP or secure websocket connection to the Blyott connection proxy (wss://proxylocator.bylott.com/aruba/{TO_BE_PROVIDED_BY_BLYOTT}). The Blyott server URL currently use a server certificate issued by the AWS for which ALL AWS Root CAs need to be installed using the following link https://www.amazontrust.com/repository/.
3. ARUBAOS
3.1. ARUBAOS CLI CONFIGURATION
3.2. ARUBAOS GUI CONFIGURATION
The ArubaOS GUI configuration example shows the configuration steps for an ArubaOS setup leveraging an Aruba Mobility Conductor to manage multiple Aruba controllers/controller clusters.
For Aruba standalone controller setups the same configuration settings apply but are directly configured in the corresponding Aruba Mobility Controller settings instead of the
Mobility Conductor “Managed Network” configuration hierarchy. Furthermore, Aruba standalone controller setups does not provide any IoT dashboard.
NOTE:
The example screenshots provided below shows the ArubaOS version 8.9 GUI. Even if the ArubaOS version 8.8 GUI has a slightly different look and feel the same configuration settings still apply.
- Login to the Aruba Mobility Conductor web interface.
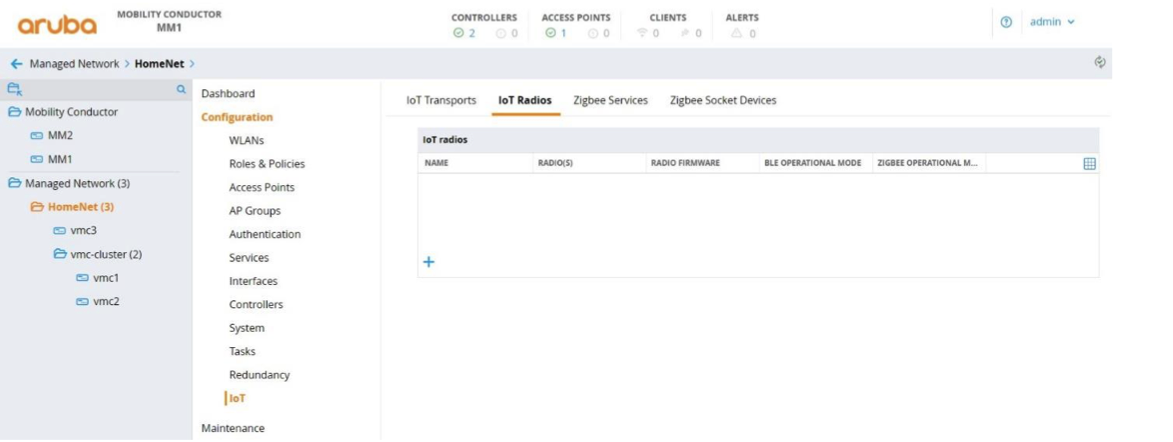
- Select the desired device or device group under Managed Network. In the menu go to Configuration > IoT to open the IoT settings page.
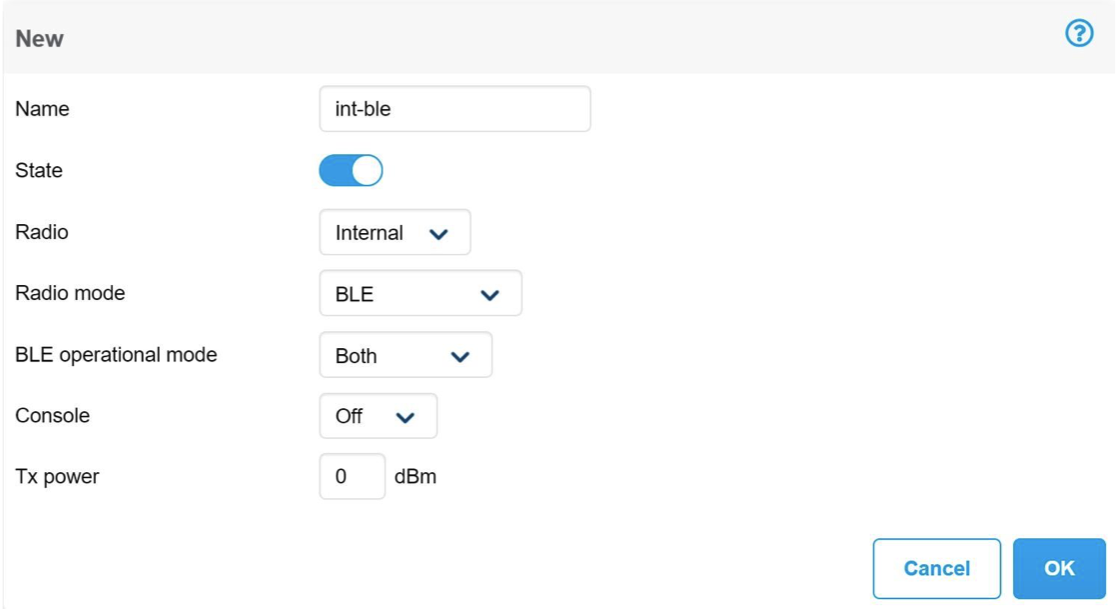
- Add a new IoT radio configuration or change an existing one to enable the BLE mode of the Aruba AP's IoT radio:
a) Click on the + icon in the IoT radios sub menu to add a new IoT radio profile.
b) Enter a profile name.
c) Select the desired radio.
d) Set the radio mode to BLE.
e) Set the BLE operational mode to both.
f) Set the AP’s BLE console mode to the desired state.
g) Set the tx power to desired value, default is 0. This setting is only relevant when using BLE advertisements sent by the AP.
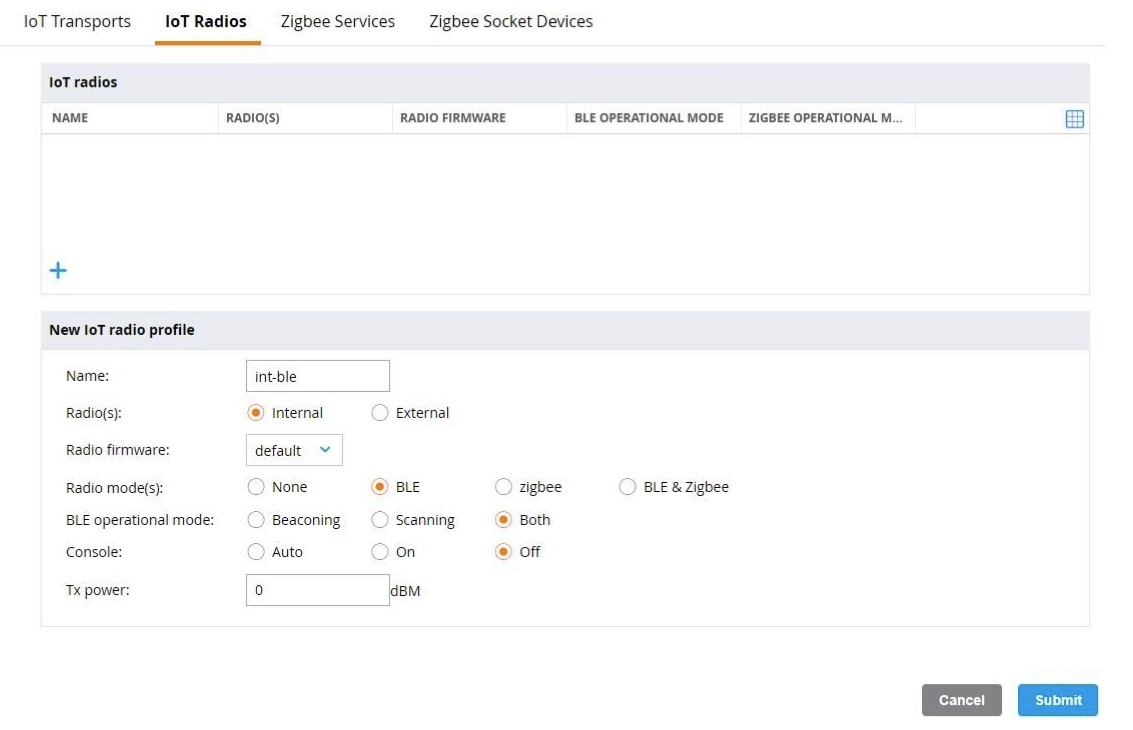
h) Click Submit to add the new iot radio profile to the configuration.
4. Apply the IoT radio configuration to the desired AP group(s):
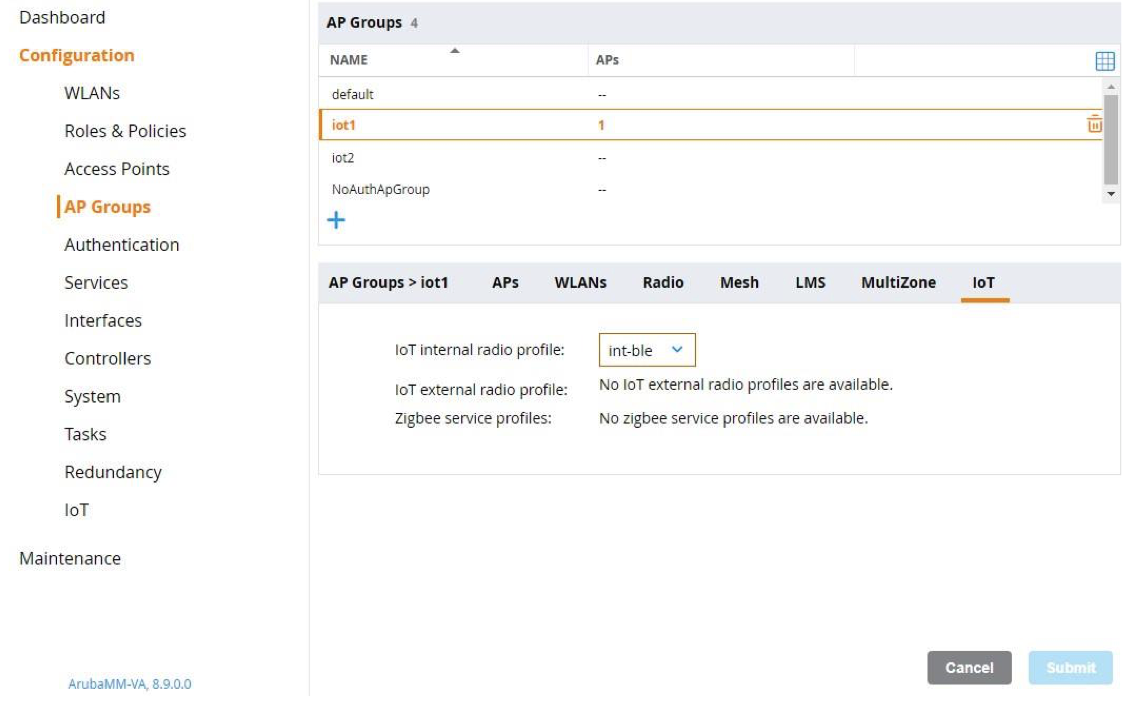
a) In the settings menu go to Configuration>AP Groups and select the desired AP Group to apply the IoT radio configuration to.
b) Click on IoT to open the IoT sub menu
c) Select the previously configured IoT radio profile for the internal or external BLE radio and click Submit to apply the profile.
d) (optional) Repeat steps 1-3 for any additional AP groups to be configured.
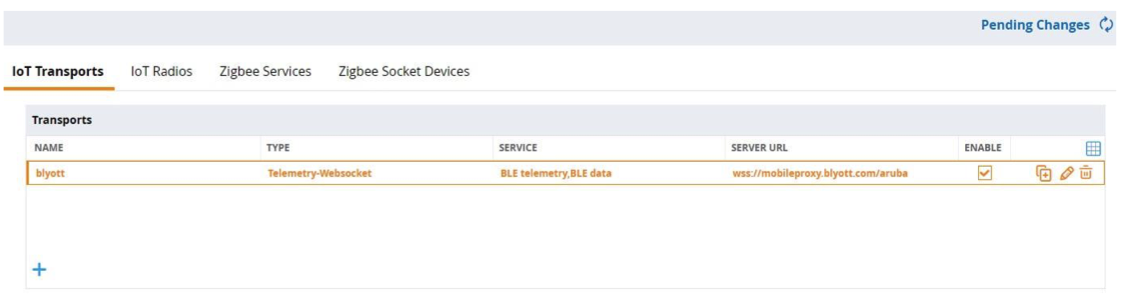
5. Add a new IoT transport profile to configure the connectivity to the Blyott solution backend:
a) Select the desired device or device group under Managed Network. In the menu go to Configuration > IoT to open the IoT settings page.
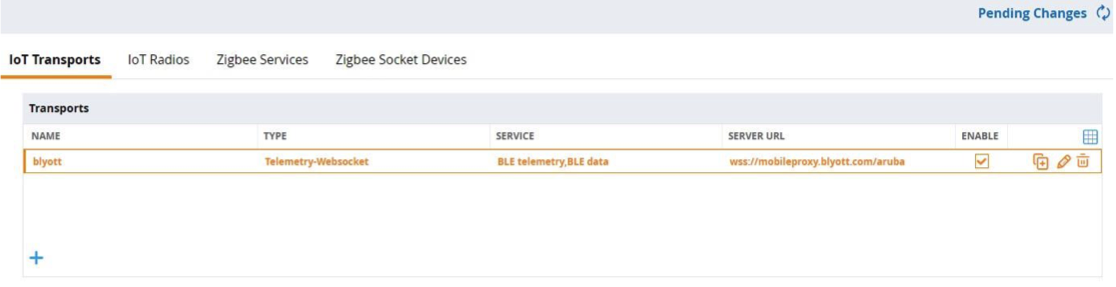
b) Click on the + icon in the IoT transports sub menu to add a new IoT transport profile.
c) Enter a profile name.
d) Set server type to Telemetry Websocket.
e) Set the State switch to enabled.
f) Enter wss://proxylocator.blyott.com/aruba/{TO_BE_PROVIDED_BY_BLYOTT}
as server URL.
g) In the destination section, select token as authentication method.
h) Enter the access token provided for your Blyott account.
i) Select the AP groups the IoT transport profile should be applied to.
j) (optional) enter a client id.
k) (optional) enter proxy server information as required.
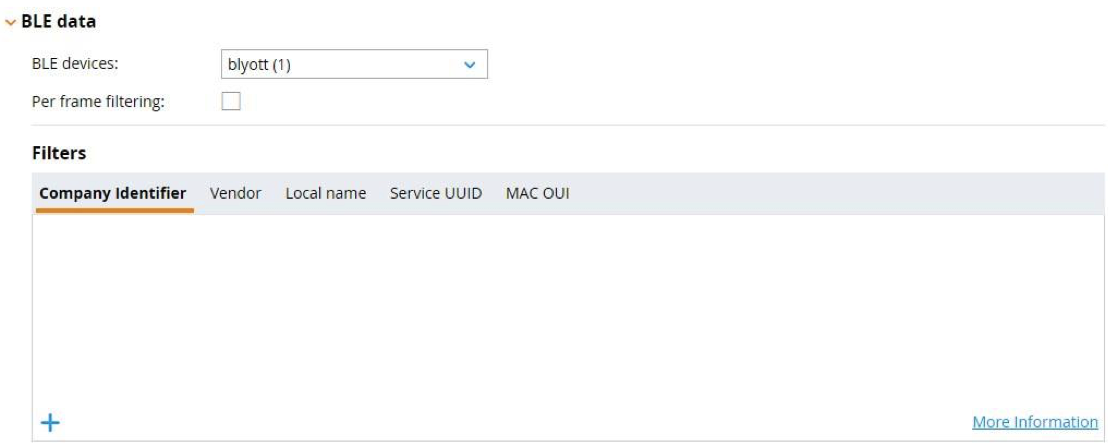
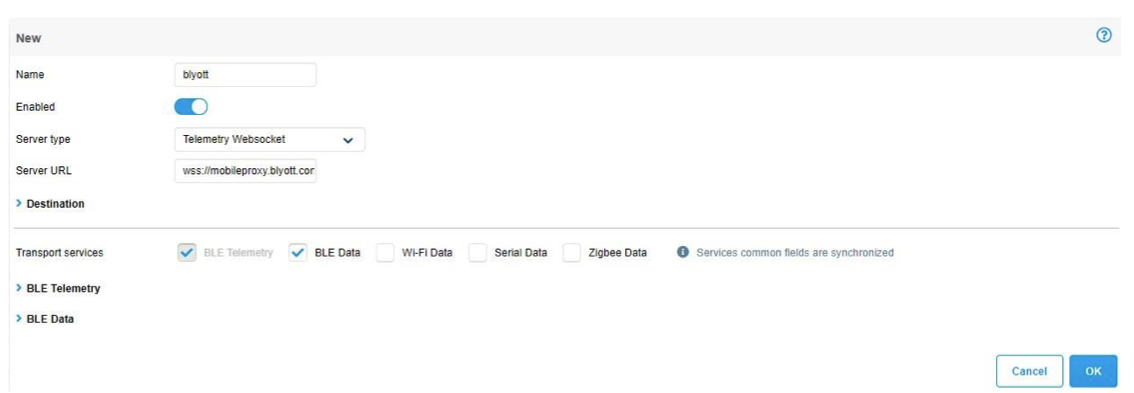
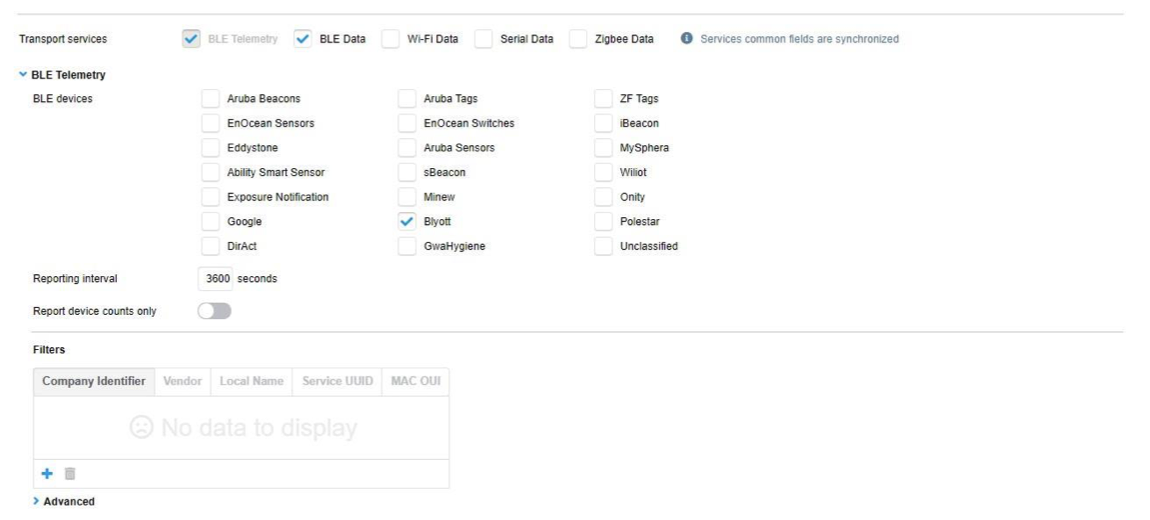
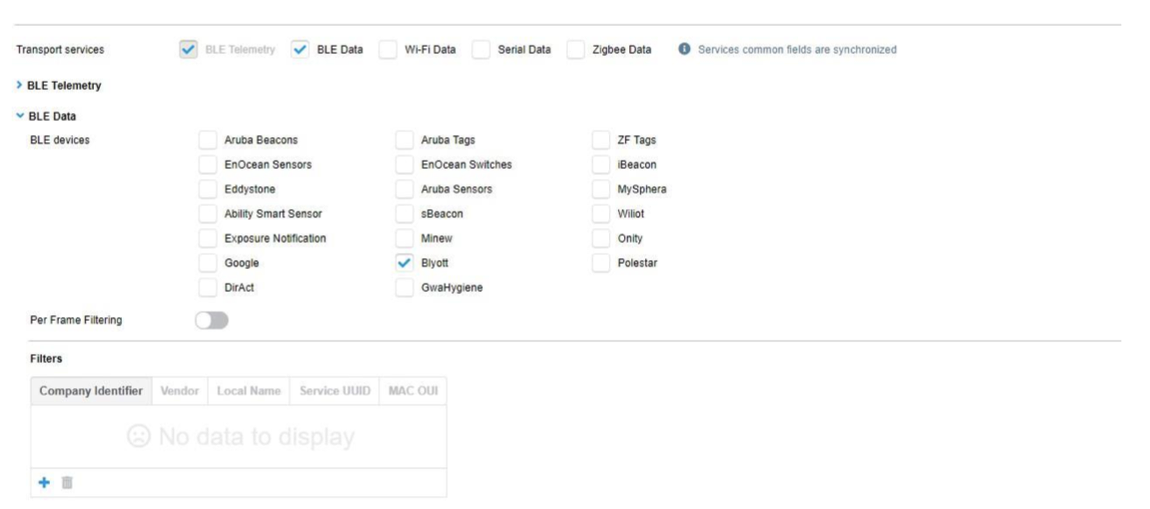
l) Select BLE data as transport service.

m) Select blyott under BLE devices for the transport service BLE telemetry. Note: The BLE device class blyott is supported with ArubaOS version 8.8 or higher.
n) Set the reporting interval to 3600 seconds.
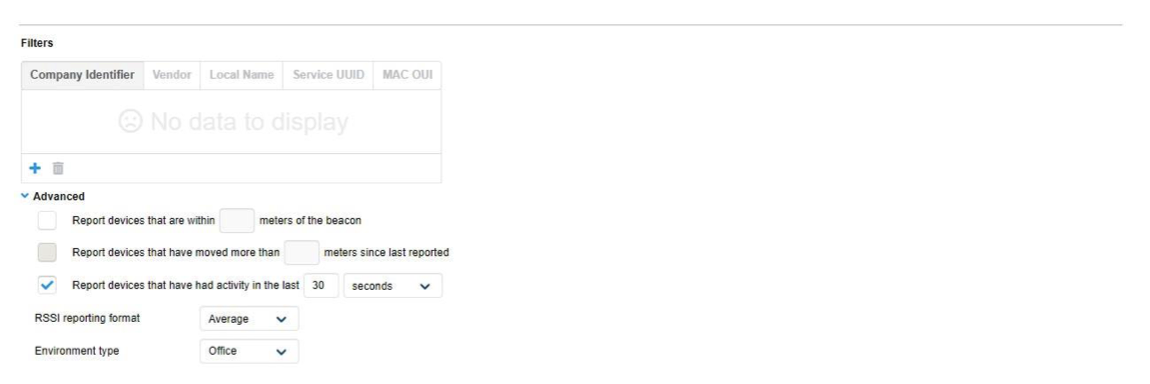
o) In the Filters section under Advanced enable the Report devices active during
the last filter and set it to 30 seconds.
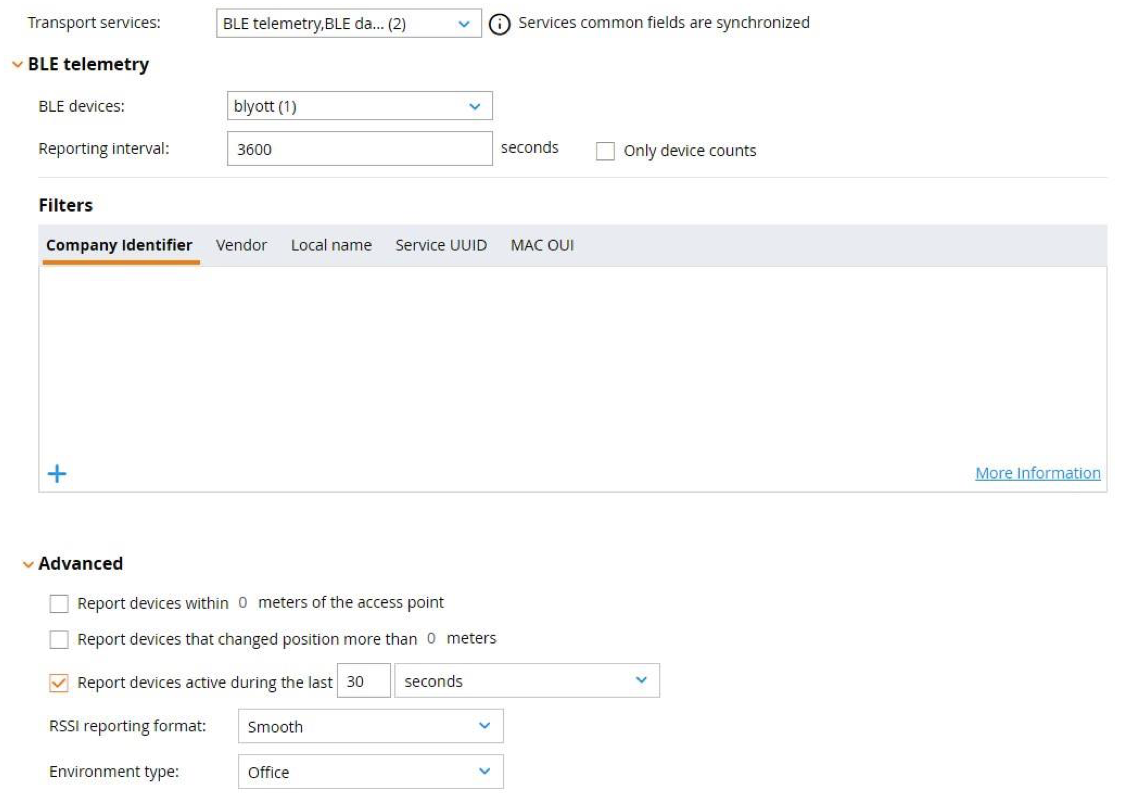
p) Select blyott under BLE devices for the transport service BLE Data.
Note:
The BLE device class blyott is supported with ArubaOS version 8.8 or higher.
q) Click Submit to add the new iot transport profile to the configuration.
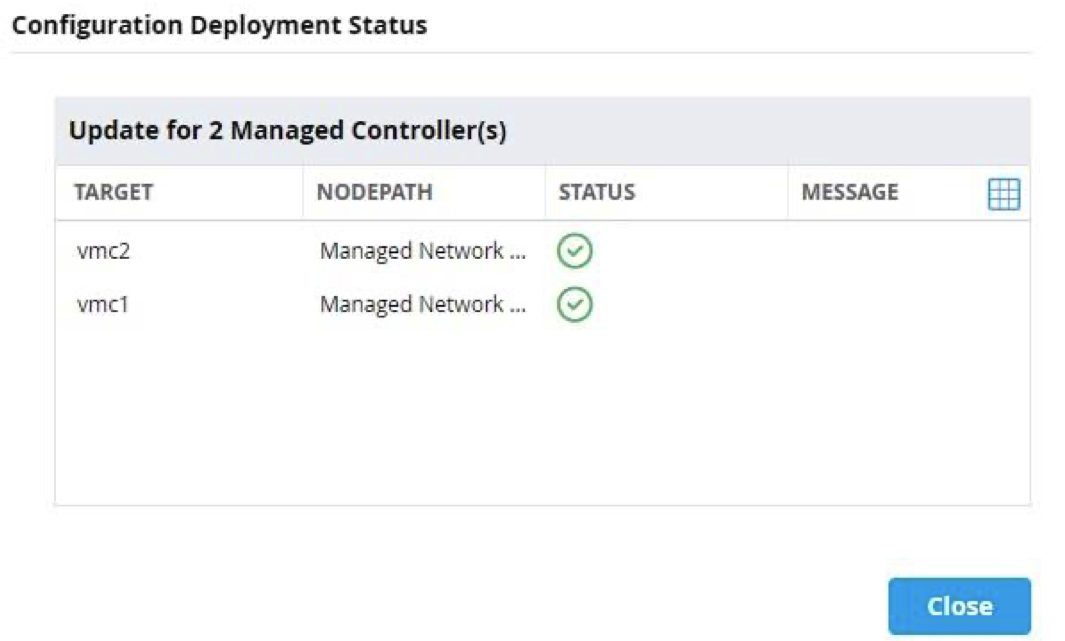
6. Click on Pending Changes and in the pop-up dialog Deploy changes to save and activate the configuration changes.
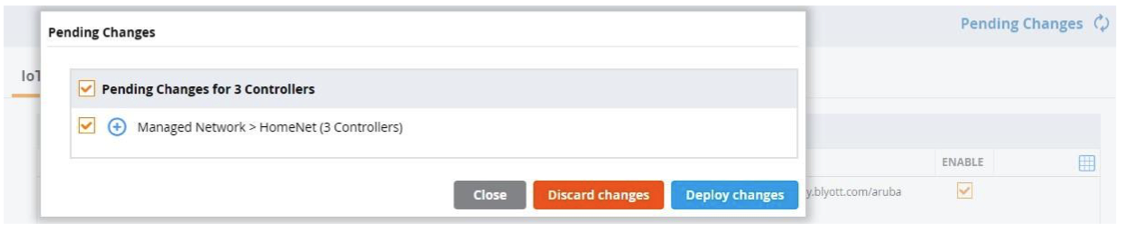
7. Wait until that the configuration changes have been successfully deployed to all selected devices.
4. ARUBAOS CONFIGURATION VERIFICATION
4.1. ARUBAOS LOCATOR STATUS IN BLYOTT DASHBOARD
To verify if the applied configuration is working properly check the locator status in the Blyott dashboard. The Last Seen field should show 5 min or less.

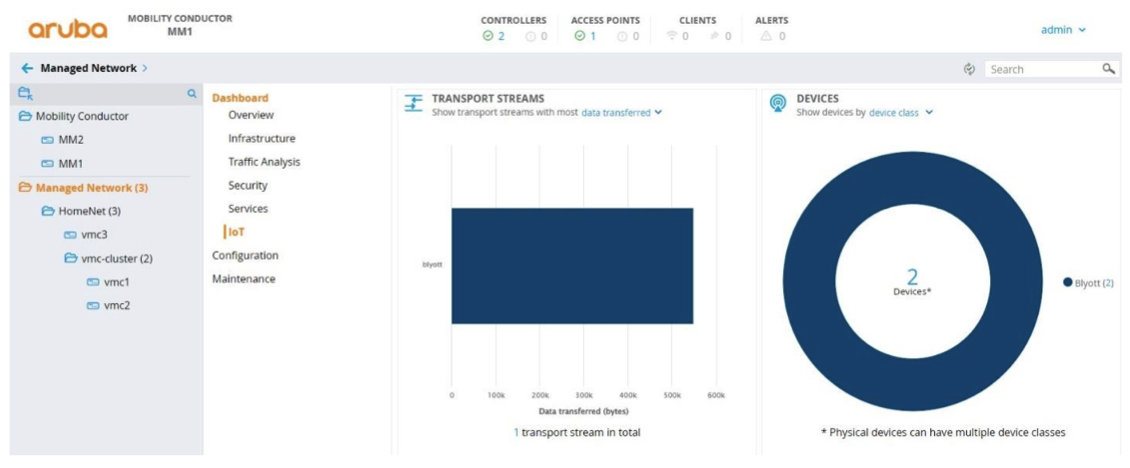
4.2. ARUBA MOBILITY CONDUCTOR IOT DASHBOARD
In Aruba Mobility Conductor setups running ArubaOS version 8.7.1.0 or higher the IoT dashboard on Mobility Conductor can be used to verify IoT transport stream and BLE device statistics.
Note:
The IoT dashboard is not available for Aruba Standalone Controller setups.- Login to the Aruba Mobility Conductor web interface.
- Select the top level Managed Network in the configuration hierarchy. In the menu go
to Dashboard > IoT to open the IoT dashboard page.
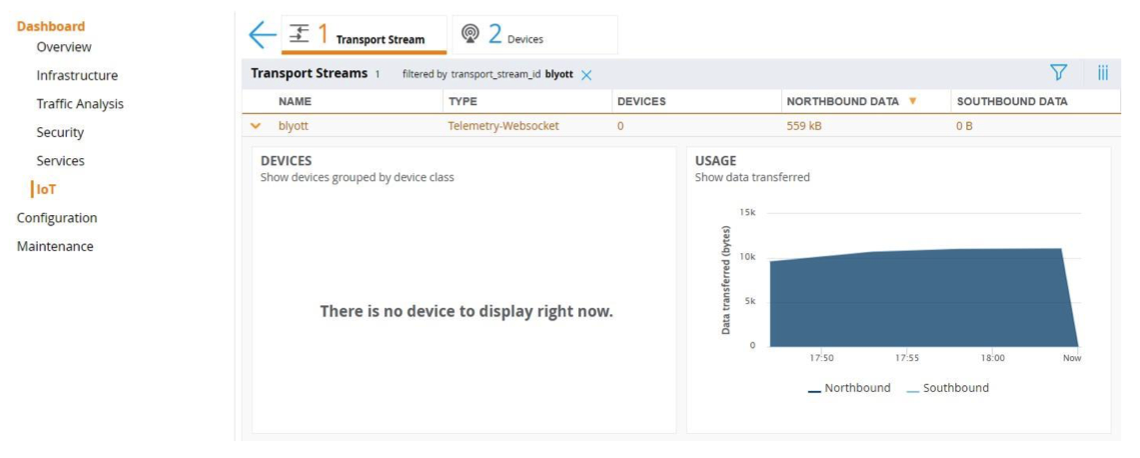
- Check if the configured IoT transport stream is listed in and the data transferred shows none zero values. Click on the specific transport stream in the dashboard to get details.

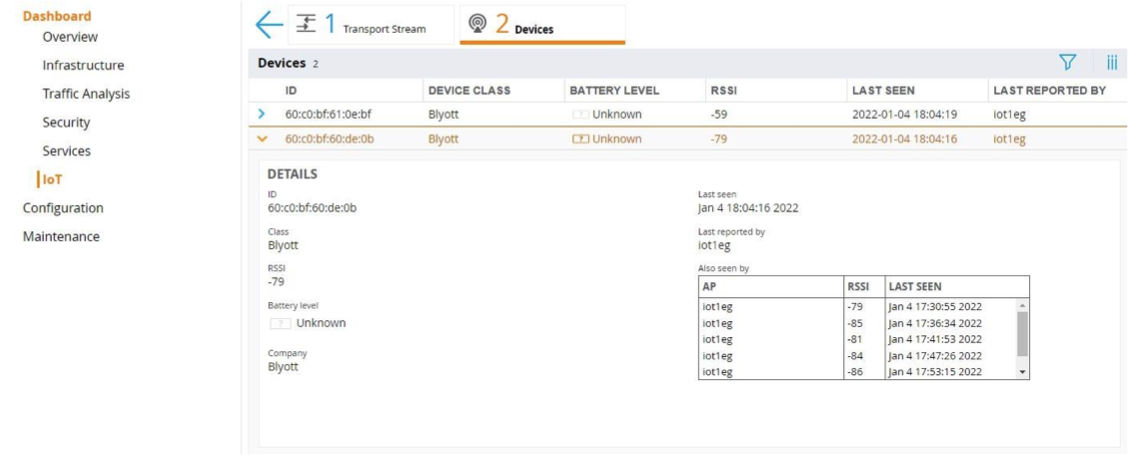
- Check if blyott devices are shown in the device list. Click on the Devices number in the dashboard to get details.

4.3. ARUBA MOBILITY CONTROLLER CLI
To verify the configuration on Aruba Mobility Controllers, in standalone mode or if managed by a Mobility Conductor, connect to the Aruba Mobility Controller using the SSH or the local console.
1. Check if Blyott BLE devices are seen by the APs BLE radio using the command show ap debug ble-table [ap-name|ip-addr|ip6-addr] generic :


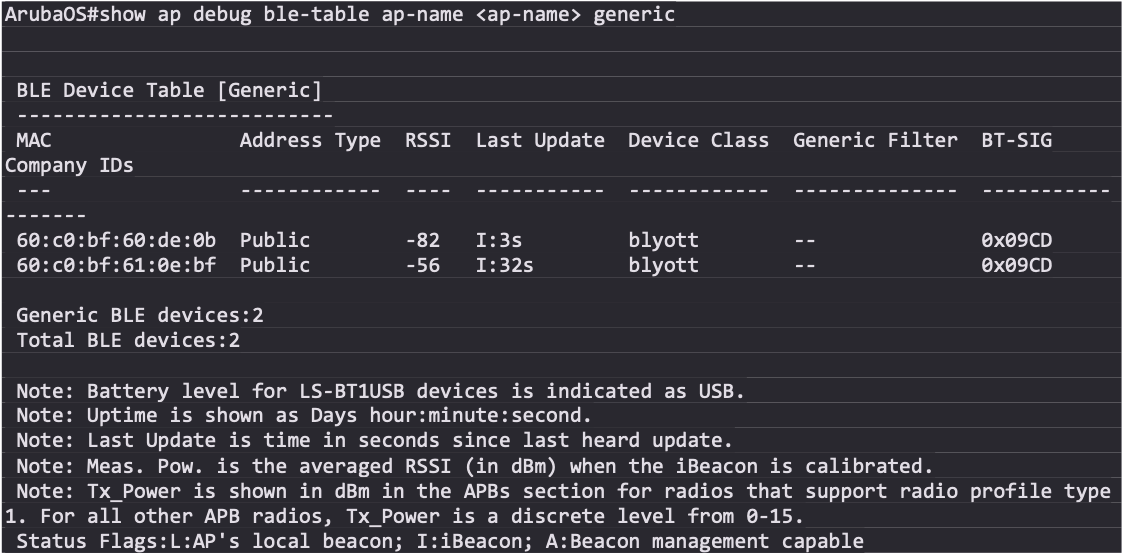

If no Blyott devices show up in the APs BLE table, check the following things:
- Are Blyott BLE devices in the range of the AP?
- Are the Blyott devices switched on?
- Has the APs IoT radio been enabled with the settings shown in the configuration
section? - Has the device class Blyott selected in the IoT transport configuration as shown in the configuration section?
2. Check if the IoT transport connection to the Blyott cloud backed has been established using the commands:
show ble_relay iot-profile
show ble_relay report
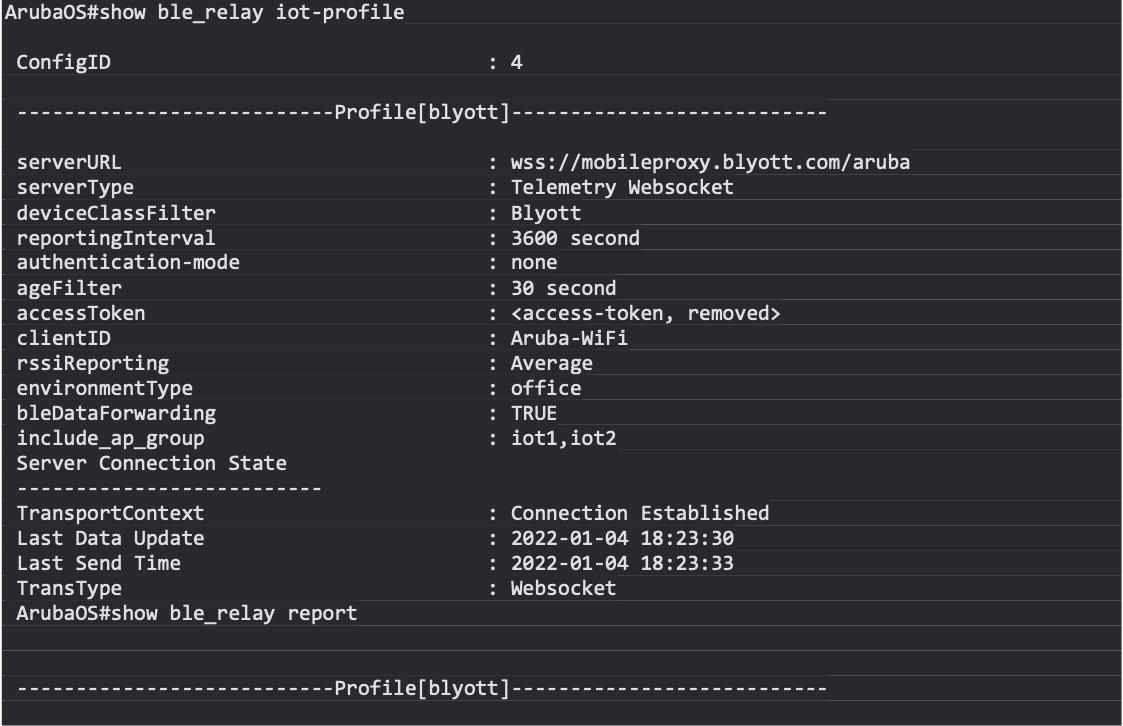
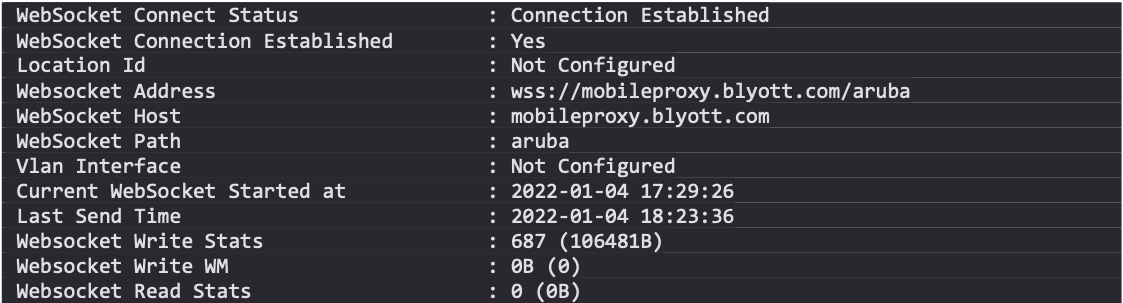
If the websocket connection status show a different status than Connection Established use the following command to check possible connection issues:
show ble-relay ws-log <profile>
3. If the connection status shows Connection Established but the communication seems not to be working correctly, use the following command to check message processing through the websocket connection:
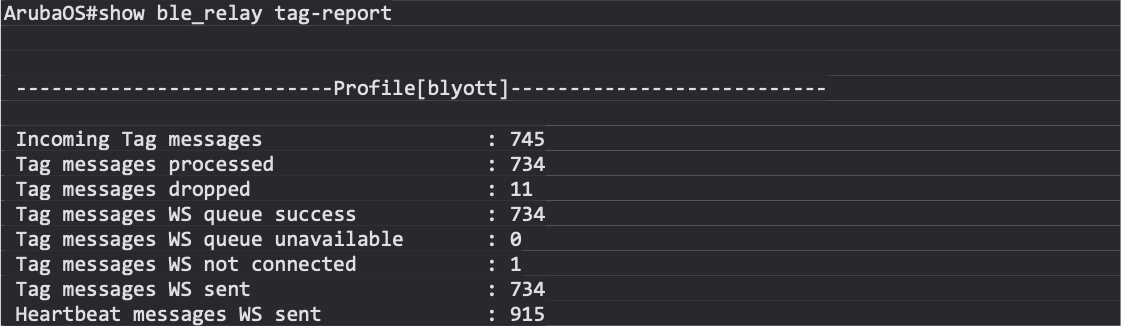
show ble_relay tag-report
Note:
Repeat the show command multiple times to see if messages counters increase. The Tag messages dropped should not increase and show only a low amount of dropped packets compared to incoming and processed messages, e.g. in the 0.x % range.
4.4. ARUBAOS - COMMON CAUSES OF CONNECTION ERRORS
- Trusted certificate chain for remote IoT server certificate not installed. Only applicable for secure connections (https://, wss://)
- Wrong authentication credentials for the remote IoT server connection (access token, username/password, clientid/secret)
- Domain name resolution not configured or not working e.g. DNS server not reachable
- Connection blocked firewall or other devices in the communication path
Note:
Starting with ArubaOS 8.8 IoT server connections are automatically established from the Mobility Controller even if no messages need to be send to the remote server e.g. because no BLE devices are seen by the Aruba AP, as long as at least one AP is connected to the controller with a configured iot transport profile.
5. ARUBA INSTANT
5.1. ARUBA INSTANT CLI CONFIGURATION
5.2. ARUBA INSTANT GUI CONFIGURATION
Note:
The example screenshots provided below shows the Aruba Instant version 8.9 GUI. Even if the Aruba Instant version 8.8 GUI has a slightly different look and feel the same configuration settings still apply.
1. Login to the Aruba Instant access point web interface.
2. In the menu on the left side go to Configuration > Services and open the sub menu IoT in the main window.
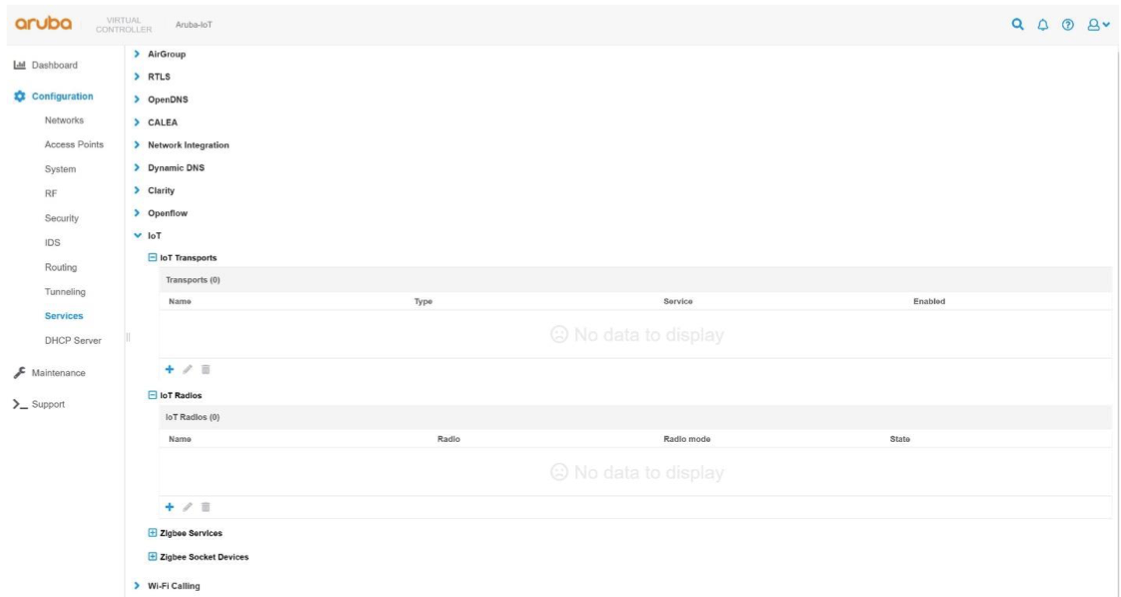
3. Add a new IoT radio configuration or change an existing one to enable the BLE mode of th e Aruba AP’s IoT radio:
a) Click on the + icon in the IoT radios sub menu to add a new iot radio profile.
b) Enter a profile name.
c) Set the state switch to enabled.
d) Select the desired radio.
e) Set the radio mode to BLE.
f) Set the BLE operational mode to both.
g) Set the AP’s BLE console mode to the desired state.
h) Set the tx power to desired value, default is 0. This setting is only relevant when using BLE advertisements sent by the AP.
i) Click OK to close the IoT radio profile dialog.
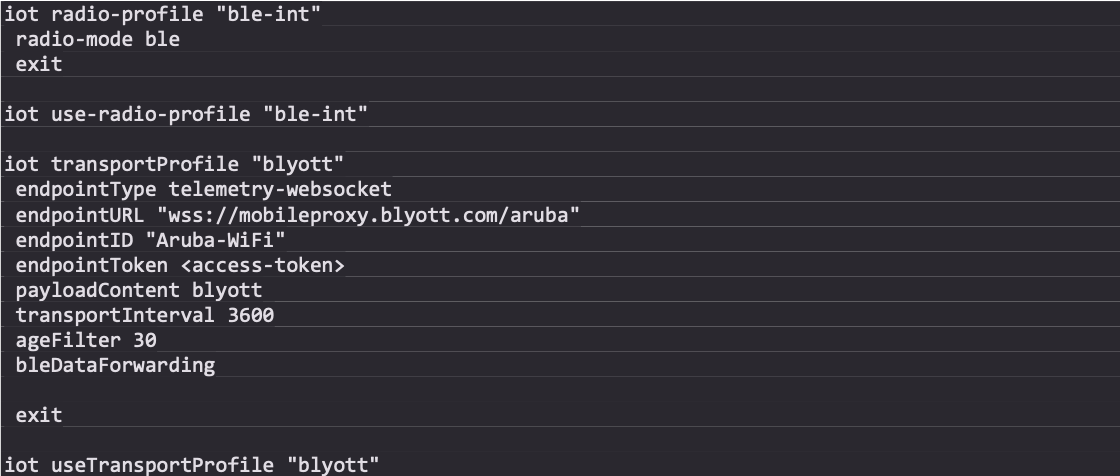
4. Add a new IoT transport profile to configure the connectivity to the Blyott solution backend:
a) Click on the + icon in the IoT transports sub menu to add a new IoT transport profile.
b) Enter a profile name.
c) Set the State switch to enabled.
d) Set server type to Telemetry Websocket.
e) Enter wss://mobileproxy.blyott.com/aruba as server URL.
f) In the destination section, select token as authentication method.
g) Enter the access token provided for your Blyott account.
h) (optional) enter a client id.
i) (optional) enter then desired VLAN ID that should be used for the server communication. Leave empty if the APs management VLAN is used.
j) (optional) enter proxy server information as required.
k) Select BLE Data as transport service.
Note:
The Transport service BLE telemetry is enabled by default and cannot be disabled.
l) Select Blyott under BLE devices for the transport service BLE telemetry.
Note:
The BLE device class Blyott is supported with Aruba Instant version 8.8 or higher.
m) Set the reporting interval to 3600 seconds.
n) In the Filters section under Advanced enable the Report devices that have had activity in the last filter and set it to 30 seconds.
o) Select Blyott under BLE devices for the transport service BLE Data.
Note:
The BLE device class Blyott is supported with Aruba Instant version 8.8 or higher.
p) Click OK to close the Iot transport profile dialog.
5. Click on Save and activate the configured settings.

6. CONFIGURATION VERIFICATION
6.1. ARUBA INSTANT LOCATOR STATUS IN BLYOTT DASHBOARD
To verify if the applied configuration is working properly check the locator status in the
Blyott Dashboard. The Last Seen field should show 5 min or less.
1. Check if Blyott BLE devices are seen by the APs BLE radio using the command show ap debug ble-table generic:
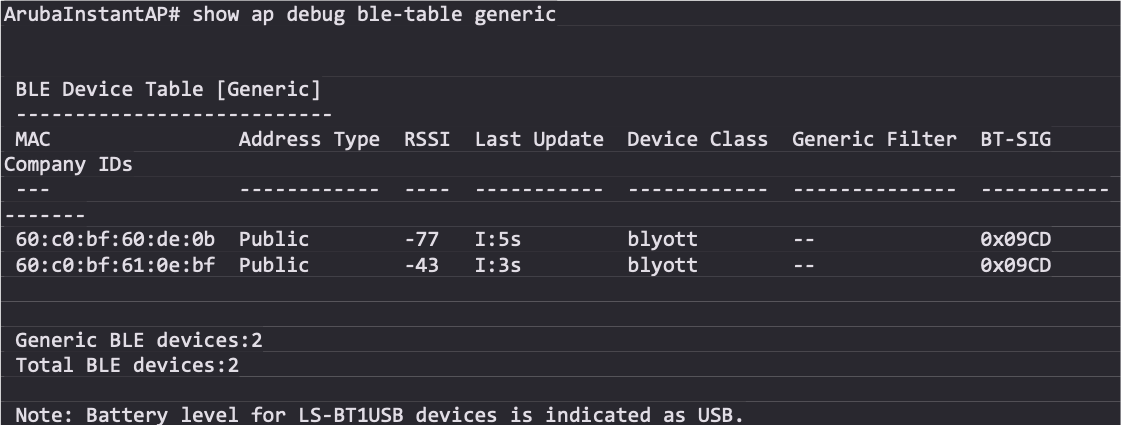
If no Blyott devices show up in the APs BLE table, check the following things:
- Are Blyott BLE devices in the range of the AP?
- Are the Blyott devices switched on?
- Has the APs IoT radio been enabled with the settings shown in the configuration section?
- Has the device class Blyott selected in the IoT transport configuration as shown in the configuration section?
2. Check if the IoT transport connection to the Blyott cloud backed has been
established using the commands:
show ap debug ble-relay iot-profile
show ap debug ble-relay report
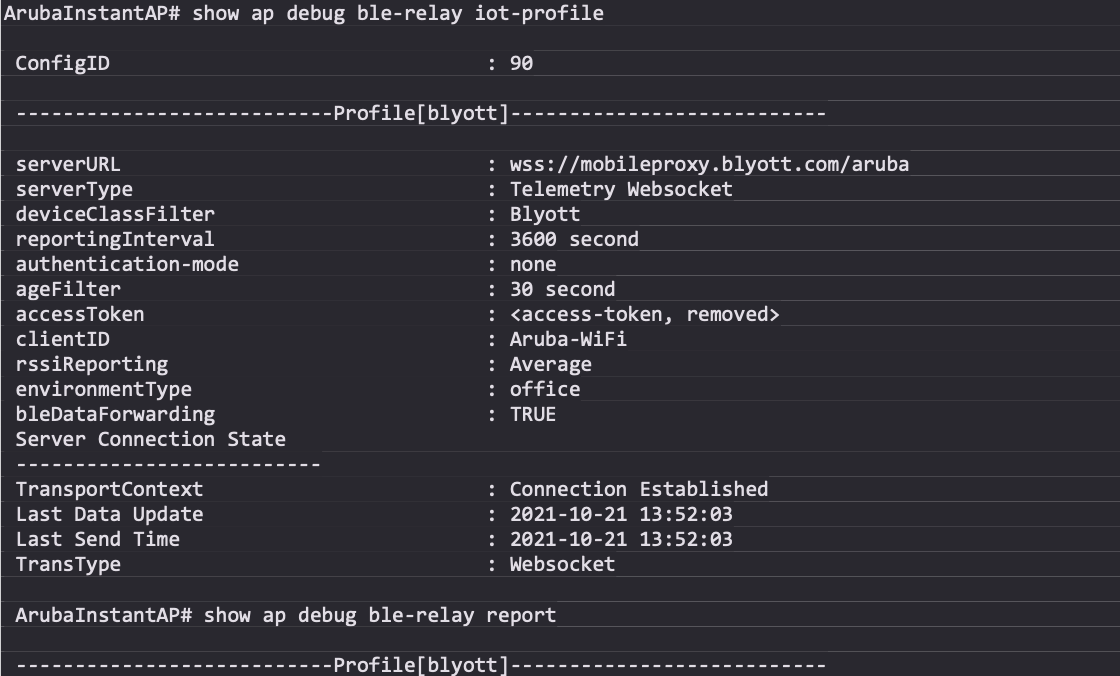
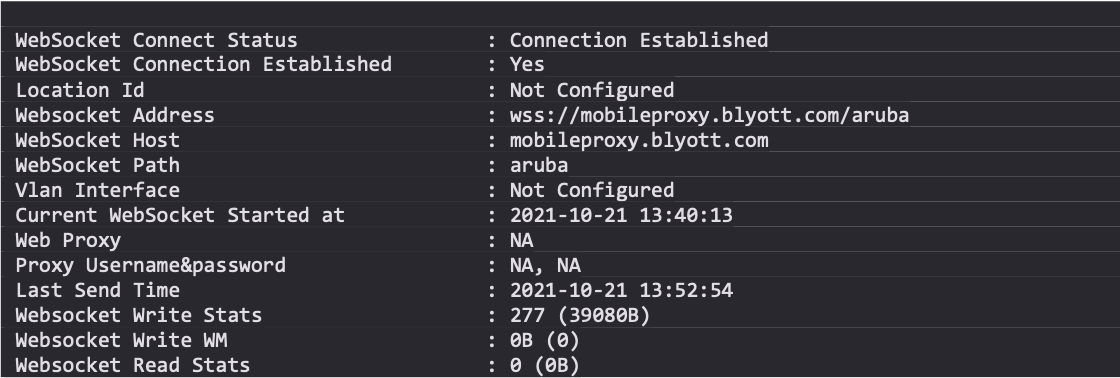
If the websocket connection status show a different status than Connection Established use the following command to check possible connection issues:
show ap debug ble-relay ws-log <profile>
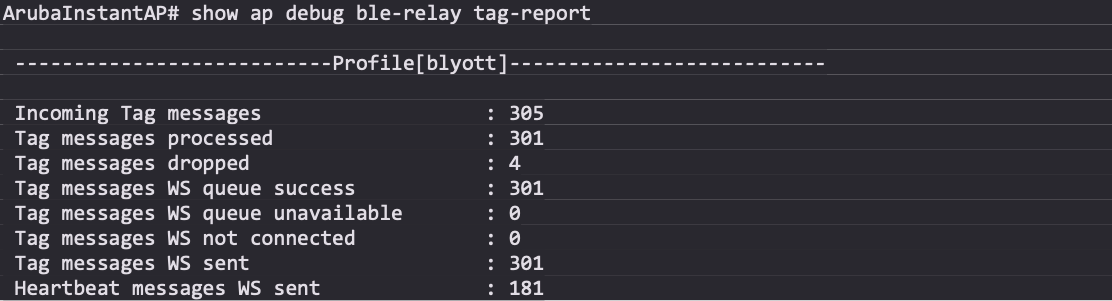
3. If the connection status shows Connection Established but the communication seems not to be working correctly, use the following command to check message processing thought the websocket connection:
show ap debug ble-relay tag-report
Note:
Repeat the show command multiple times to see if messages counters increase. The Tag messages dropped should not increase and show only a low amount of dropped packets compared to incoming and processed messages, e.g. in the 0.x % range.
6.2. ARUBA INSTANT - COMMON CAUSES OF CONNECTION ERRORS
- • Trusted certificate chain for remote IoT server certificate not installed. Only applicable for secure connections (https://, wss://)
- Wrong authentication credentials for the remote IoT server connection (access token, username/password, clientid/secret)
- Domain name resolution not configured or not working e.g. DNS server not reachable
- Connection blocked firewall or other devices in the communication path
Starting with Aruba Instant 8.8 IoT server connections are automatically established even if no messages need to be sent to the remote server e.g. because no BLE devices are seen by the Aruba AP.
7. ADD ARUBA AP LOCATOR ON THE BLYOTT PORTAL
Before we start, I would recommend seeing our Onboarding Handbook for more details on Blyott Portal. We have also created a support portal containing information about the Blyott platform which you can access here. The support portal contains a knowledge base where you can find all relevant information about the platform including Blyott latest API documentation.
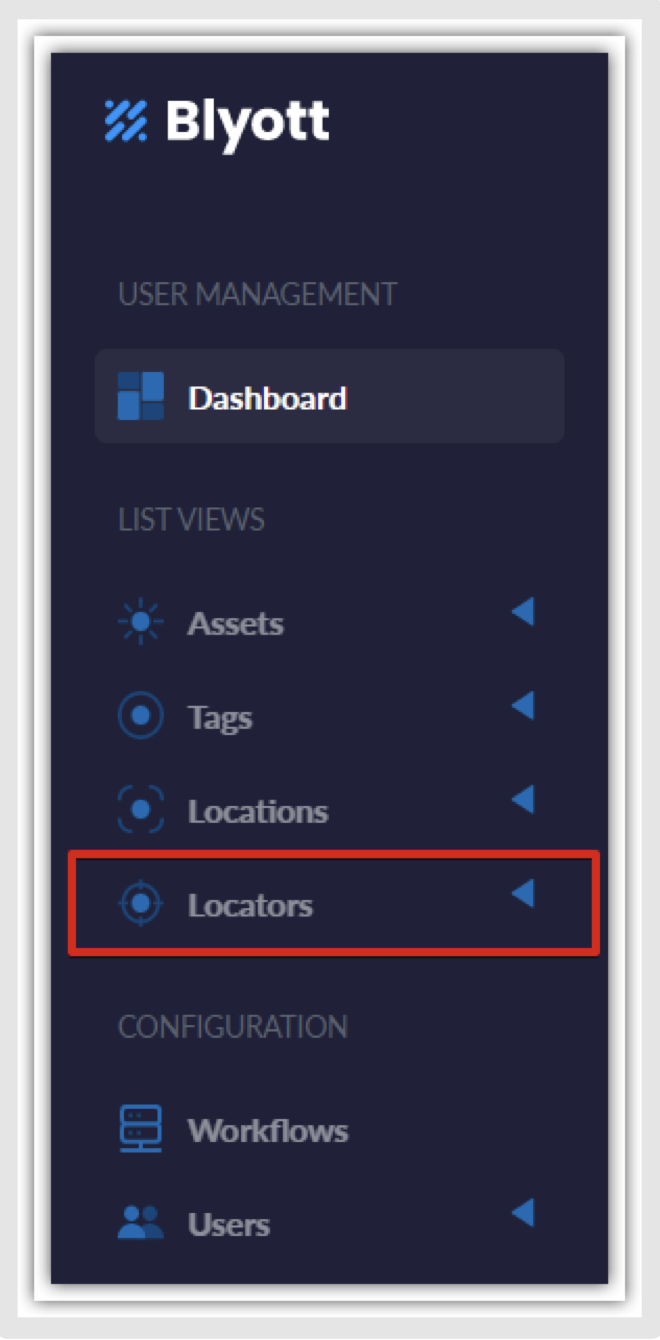
Select the “Locators” tab from the “List Views” panel (take note that different screen sizes change the panel’s layout; on smaller screens, the panel will be on the right side because of the responsiveness of the webpage - RWD).
7.1. ADD NEW LOCATOR
⊲ To add Locators, click on “+ New Locator” button from the top left corner of the screen.:

⊲ Fill in all data fields. The data fields marked with “*” are mandatory while others are optional.

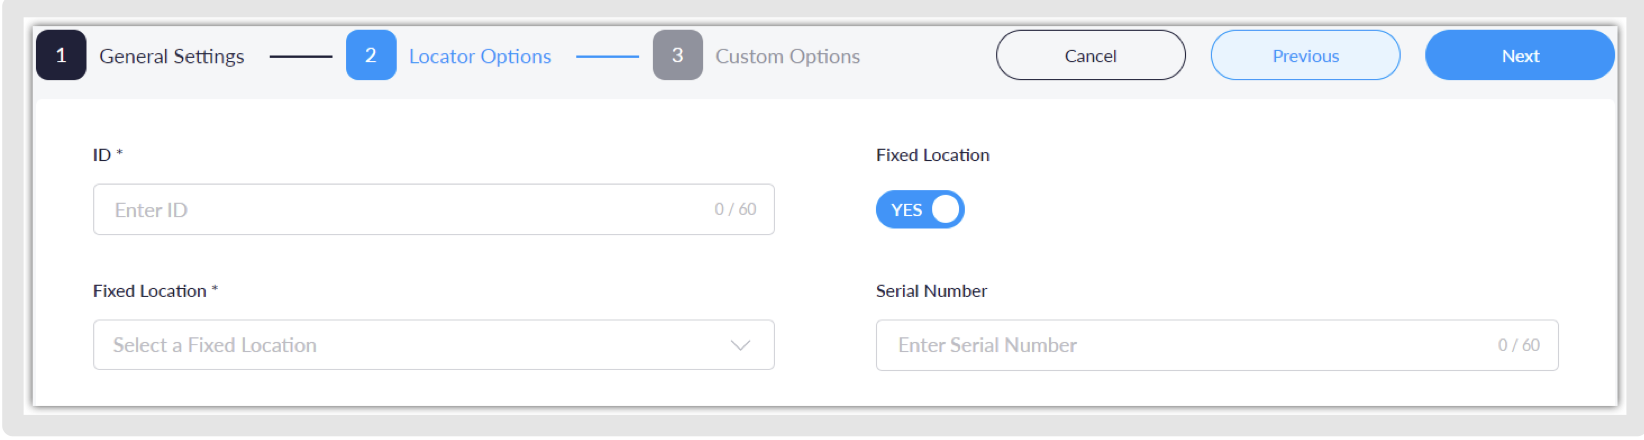
- “Locator Name” - Enter desired locator name.
- “Hardware Model” - Select “Aruba | BLE-enabled”.
- “ID” (MAC)* - Enter “Ethernet” (not BLE) MAC address of the AP.
- “Fixed Location” - You will need to create locations in the “Location” tab before you can select the Fixed location. If you already have Locations, just select the desired Fixed Location from the dropdown list.
- “Serial Number” - Enter serial number of the device (optional).
⊲ *Make sure to enter the correct MAC ID. This can be confirmed locally with your IT team and/or occasionally marked on the device. Enter the MAC address in capital letters and without the colon (:)
8. IMPORTANT NOTES
8.1. ETHERNET MAC ADDRESS OF ARUBA DEVICE
When working with ARUBA, the client should add per Wi-Fi AP the Ethernet MAC address (not the Bluetooth MAC address). It is the Ethernet MAC address of each AP that the Aruba WLAN controller sends to the Blyott cloud platform.
8.2. UPDATING THE ARUBAOS DISABLE BLE
Be sure to check the BLE option after you update Aruba OS, as we experienced this issue before. Updating OS change BLE to disabled as a default.
8.3. CHECK YOUR ARUBA FIRMWARE VERSION
We highly recommend updating it to the latest firmware for best performance but take in mind, depending on the firmware version you need to use different authentication methods. If your Aruba SW is v8.7 or lower, you could use “telemetry-HTTPS”. If using Aruba SW 8.8 or higher, you could use only the “telemetry-websocket” method.
8.4. FIREWALL SETTINGS
Take kindly note, the firewall can have potential blocker settings that can block the connection to our servers. Usually, we need to make sure our clients have opened ports 443(HTTPS) and 8883 on their firewall or router if they are using Blyott Locators. As per reports, the Aruba endpoint is using port 80 (443 if it uses HTTPS).
9. ADDITIONAL ARUBA INFORMATION
9.1. ARUBAOS 8.6 USER GUIDES
- Offical User Guide on ArubaOS can be found in this PDF file.
- Official Getting Started Guide on ArubaOS can be found in this PDF file.
9.2. ARUBA AP SOFTWARE QUICK START GUIDE
- Official AP Software Quick Start Guide can be found in this PDF file.
9.3. ARUBAOS 8.6 API DOCUMENTATION
• The full official API documentation can be found in this PDF file.
9.4. ARUBA OFFICIAL FAQ
• Official FAQ documentation can be found in here.
10. BLYOTT SUPPORT & ASSISTANCE
Within this Help Center, we aim to provide you with useful information, documentation, and guidance that will enable you to make the most out of your access to the Blyott Platform. In the Knowledge base section you can find a video walkthrough guide for the support page, Release Notes, Documentation, Manuals, and “How to” guides.
Please be reminded that you need to register/log in to the support page to access all Blyott- related documentation.
If you have any questions or suggestions at all, please feel free to get in touch with us at helpdesk.blyott.com
Thanks and regards,
The Blyott Support Team